MPExtension Features
Omnibar Model Search Tutorial

Step 1: Install and Enable the Omnibar Feature
- Ensure that the MPExtension is installed and activated in your Chrome browser.
Step 2: Use the Omnibar for Model Search
- Click on the browser's address bar or press Ctrl + L (Windows) / Cmd + L (Mac).
- Type the keyword MP followed by a space. The Omnibar will activate and display smart suggestions based on your model names.

-
Use the arrow keys or mouse to select the desired model from the dropdown.
Step 3: Navigate to the Model
- Press Enter after selecting a model, and the Omnibar will take you directly to the Matterport model's URL.
Tips for Optimizing the Omnibar Experience
- Use clear and descriptive names for your models to improve search accuracy.
- Bookmark frequently accessed models for even faster navigation.
- Combine the Omnibar feature with Quick Model Searching for maximum efficiency.
Model Bookmarking Tutorial
The Model Bookmarking feature in MPExtension allows you to save and organize your most frequently used Matterport models for quick access. Follow the steps below to learn how to use this feature effectively.
Step 1: Bookmark a Model
- Open a model in the Matterport Showcase interface.
-
Look for the Bookmark Icon in the upper-right corner of the model interface.

-
Click the icon to bookmark the model. The icon will change color to confirm the model is bookmarked.

Step 2: Access Bookmarked Models
- Open the MPExtension by clicking the extension icon in Chrome.
-
Go to the Bookmarks Tab in the sidebar to view your saved models.

- Click on a bookmarked model to open it instantly.
Step 3: Manage Bookmarks
- Rearrange: Drag and drop models in the Bookmarks Tab to organize them.
- Delete: Click the delete icon next to a model to remove it from your bookmarks.
- Search: Use the search bar in the Bookmarks Tab to quickly find specific models.
Step 4: Customize Bookmark Settings
Navigate to the MPExtension settings to enable or disable the Bookmark Icon in the Showcase interface and adjust preferences for managing bookmarks.

Tips for Best Use
- Bookmark models you frequently edit or present to save time navigating your library.
- Organize bookmarks by project, client, or priority for easy access.
Quick Model Searching Tutorial
The Quick Model Searching feature in MPExtension helps you locate specific models in your Matterport Dashboard with ease. This is especially useful for MSPs managing a large number of models across multiple projects and clients.
Step 1: Open the MPExtension Sidebar
- Click the MPExtension icon in your Chrome toolbar to open the sidebar.
- Make sure the sidebar is displaying the main Dashboard view.
Step 2: Use the Search Bar
- Locate the Search Bar at the top of the MPExtension sidebar.
- Enter keywords, project names, or other identifiers associated with the model you’re looking for.
- View the filtered list of models that match your search query.
Step 3: Select and Open a Model
- Click on a model from the search results to open it directly in the Matterport Showcase interface.
- Use the Clear Search button to reset the search bar and return to the full model list.
Tips for Efficient Searching
- Use specific keywords or unique identifiers to narrow down results quickly.
- Consistently name models using clear and descriptive titles for easier searches.
- Bookmark frequently accessed models for even quicker navigation. (See the Model Bookmarking Tutorial.)
Quick Model Editing Access Tutorial
The Quick Model Editing Access feature in MPExtension allows you to instantly open editing tools for your Matterport models. Save time by skipping multiple menu clicks and directly accessing the editing interface from your dashboard.
Step 1: Open the MPExtension Sidebar
- Click the MPExtension icon in your Chrome toolbar to open the sidebar.
- Ensure you’re on the main Dashboard view within the MPExtension sidebar.
Step 2: Locate the Model
- Browse or use the Search Bar in the MPExtension sidebar to locate the model you want to edit.
- Locate the specific model from the displayed list.
Step 3: Access Editing Tools
- Click the Edit Icon next to the model’s name in the sidebar.
-
The model editing tools will open directly, allowing you to:
- Adjust tags, descriptions, or labels.
- Update navigation paths or model settings.
- Save and publish changes instantly.
Step 4: Save Changes
After making your changes, click the Save button to ensure all updates are applied.
Tips for Efficient Editing
- Use the search feature in the sidebar to quickly locate the model you want to edit.
- Bookmark frequently edited models for quicker access. (See the Model Bookmarking Tutorial.)
- Regularly update model descriptions and tags for better organization and searchability.
Quick Image Browsing and Downloading Tutorial
The Quick Image Browsing and Downloading feature in MPExtension allows you to access and save images associated with your Matterport models effortlessly. This feature is perfect for creating presentations, marketing materials, or client reports.
Step 1: Open the MPExtension Sidebar
- Click the MPExtension icon in your Chrome toolbar to open the sidebar.
- Navigate to your list of Matterport models within the MPExtension sidebar.
Step 2: Browse Images
- Select a model from the list to view its details.
- Click on the Images Tab to browse all associated images for the selected model.
- Scroll through the gallery to view the available images.
Step 3: Download Images
- Hover over an image in the gallery and click the Download Icon.
- The image will be saved to your computer in its original resolution.
- Use the Download All button to save all images in one go.
Tips for Efficient Image Management
- Use the gallery to preview images before downloading to ensure you select the right ones.
- Organize downloaded images into folders based on projects or clients for easier access later.
- Combine this feature with the Quick Model Searching Tutorial to quickly find and download images from specific models.
Quick Model Export Tutorial
The Quick Model Export feature in MPExtension lets you export data from your Matterport models into formats like CSV or Excel. This makes it simple to share reports with clients or perform internal analysis.
Step 1: Open the MPExtension Sidebar
- Click the MPExtension icon in your Chrome toolbar to open the sidebar.
- Navigate to the Export Tab in the MPExtension sidebar.
Step 2: Select a Model
- Use the search or scroll function to locate the model you want to export data from.
- Click the Select Model button next to the model you want to export.
Step 3: Choose Export Format
- After selecting a model, choose your desired export format (e.g., CSV, Excel).
- Click the Export button to begin the download process.
Step 4: Review Exported Data
Once downloaded, open the exported file in your preferred software (e.g., Excel or Google Sheets) to view and analyze the data.
Tips for Exporting Models
- Use consistent file naming conventions for easier organization of exported data.
- Combine this feature with the Quick Model Searching Tutorial to locate models for export more efficiently.
- Export data regularly for backup purposes or to maintain updated client records.
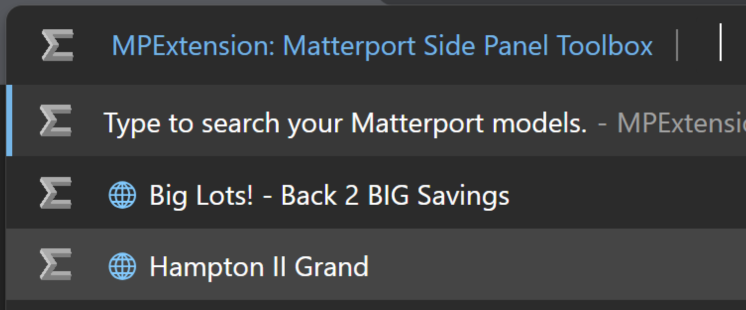
MPExtension Side Panel Tutorial
The MPExtension Side Panel is a sleek, intuitive addition to the Matterport Dashboard. It offers quick access to essential features and tools, streamlining your workflow and enhancing navigation.
Step 1: Open the MPExtension Side Panel
- Click the MPExtension icon in your Chrome toolbar to open the sidebar.
- The side panel will appear within the Matterport Dashboard interface, displaying all available features.
Step 2: Navigate the Features
- Use the sidebar tabs to switch between different tools and features, such as bookmarks, search, and model exports.
- Access the settings icon to customize your side panel layout, visibility, and startup preferences.
Step 3: Perform Actions Directly
The side panel integrates directly with the Matterport Dashboard, allowing you to:
- Search and access models instantly.
- Edit model details without leaving the dashboard.
- Bookmark models for future use.
- Export data with just a few clicks.
Step 4: Customize Your Experience
Open the settings menu in the sidebar to adjust its behavior:
- Toggle between minimized or expanded views.
- Enable or disable specific features for a tailored experience.
Tips for Using the Side Panel
- Keep frequently used tools like bookmarks and search pinned for easy access.
- Customize the layout to minimize distractions while working in the Matterport Dashboard.
- Explore all tabs to take full advantage of the features offered by MPExtension.
Auto & Custom Model IDs Tutorial
The Auto & Custom Model IDs feature in MPExtension helps Matterport Service Providers (MSPs) efficiently manage and organize their models by enabling automatic or manual assignment of internal IDs. This ensures streamlined workflows and alignment with project or client requirements.
Step 1: Enable Auto-Assign Model IDs
- Open the MPExtension by clicking the extension icon in your Chrome toolbar. -->
- Navigate to the Settings Tab in the sidebar.
- Enable the Auto-Assign Model IDs toggle to activate automatic ID generation for new models.
Step 2: Assign Custom Model IDs
- Open the model you wish to customize in the Matterport Dashboard.
- In the MPExtension sidebar, locate the Model Settings section for the selected model.
- Enter a custom internal ID in the provided field and click Save.
Step 3: Manage and Edit IDs
- View all assigned IDs in the MPExtension dashboard for a quick overview of your models.
- Edit or update existing IDs by selecting a model and modifying its internal ID field.
- Use filters or search to locate models based on their internal IDs.
Step 4: Use IDs for Automation
Leverage assigned model IDs to integrate with your workflow tools for tasks like automated invoicing, reporting, or project tracking.
Tips for Optimizing ID Management
- Use consistent naming conventions for easy identification and tracking.
- Combine this feature with Quick Model Searching to locate models by ID efficiently.
- Regularly review and update custom IDs to maintain accurate project records.
Real-Time Model Updates Tutorial
The Real-Time Model Updates feature in MPExtension keeps you informed about changes to your Matterport models as they happen. This ensures you’re always working with the latest data, streamlining collaboration and enhancing workflow efficiency.
Step 1: Enable Real-Time Updates
- Open the MPExtension by clicking the extension icon in your Chrome toolbar.
- Navigate to the Settings Tab in the sidebar.
- Toggle on the Real-Time Updates option to activate notifications for model changes.
Step 2: Monitor Model Changes
- When a change is made to a model (e.g., edits, tags, navigation paths), a notification will appear in the MPExtension sidebar.
- Click on the notification to view the details of the update or access the model directly.
Step 3: Use Notifications to Stay Informed
- Notifications provide key information such as the type of change, the user who made the change, and the timestamp.
- Use this feature to ensure team members are aware of updates, minimizing miscommunication or version conflicts.
Step 4: Filter and Manage Notifications
- In the sidebar, use filters to view notifications by model, change type, or user.
- Mark notifications as read or archive them for future reference.
Tips for Optimizing Real-Time Updates
- Regularly check notifications to ensure your models are up-to-date.
- Enable email or desktop alerts for critical updates requiring immediate action.
- Combine this feature with Model Bookmarking to keep your frequently updated models easily accessible.
Customizable Settings Tutorial
The Customizable Settings feature in MPExtension allows you to personalize how the extension integrates with your Matterport Dashboard, providing a more tailored and efficient workflow.
Step 1: Access MPExtension Settings
- Open the MPExtension by clicking the extension icon in your Chrome toolbar.
- Navigate to the Settings Tab in the sidebar menu.
Step 2: Toggle Visibility in Showcase
- Use the Show/Hide MPExtension in Showcase toggle to enable or disable the MPExtension icon within the Matterport Showcase interface.
- Save your preference to update the visibility of the extension immediately.
Step 3: Choose Default Extension State
- Select whether the MPExtension sidebar should start in a Minimized or Expanded state when opened.
- This option allows for a less intrusive interface tailored to your workflow.
Step 4: Adjust Bookmark Icon Settings
Enable or disable the Bookmark Icon within the Showcase interface. This gives you control over whether the icon is visible while browsing models.
Step 5: Additional Settings
- Customize notification preferences for updates or changes to your models.
- Set default export formats (e.g., CSV or Excel) for Quick Model Export.
Tips for Optimizing Settings
- Adjust settings based on your workflow to maximize efficiency.
- Regularly review and update settings to match your evolving needs.
- Combine customized settings with features like Real-Time Model Updates for a seamless workflow.
Quick Add-Ons Access Tutorial
The Quick Add-Ons Access feature in MPExtension enables you to explore and integrate additional tools and services directly into your Matterport workflow. This functionality centralizes access to Matterport Partner Add-Ons and enhances productivity by reducing the need for external navigation.
Step 1: Access the Add-Ons Tab
- Open the MPExtension by clicking the extension icon in your Chrome toolbar.
- Navigate to the Add-Ons Tab in the sidebar menu.
Step 2: Browse Available Add-Ons
- Within the Add-Ons Tab, you’ll see a list of available integrations and services provided by Matterport Partners.
- Click on an Add-On to view more details, including its features and integration options.
Step 3: Enable an Add-On
- Select an Add-On from the list and click the Enable button to integrate it into your workflow.
- Follow any on-screen instructions to complete the integration process.
Step 4: Manage Integrated Add-Ons
- Use the Add-Ons Tab to enable or disable specific integrations as needed.
- Access settings for each Add-On to customize its behavior within your Matterport Dashboard.
Tips for Using Add-Ons
- Explore available Add-Ons regularly to discover new tools and features that enhance your workflow.
- Combine Add-Ons with core MPExtension features, such as Quick Model Export, to maximize efficiency.
- Use Add-Ons to streamline tasks like analytics, reporting, and client communication.
Data Export & Reporting Tutorial
The Data Export & Reporting feature in MPExtension simplifies the process of extracting data from your Matterport models. Export data in formats like CSV or Excel for analysis, client reporting, or project documentation.
Step 1: Open the Export Tab
- Open the MPExtension by clicking the extension icon in your Chrome toolbar.
- Navigate to the Export Tab in the sidebar.
Step 2: Select Models for Export
- Use the search or scroll function in the Export Tab to locate the models you want to export.
- Check the box next to the models you want to include in the export.
Step 3: Choose Export Format
- Select the desired export format, such as CSV or Excel.
- Click the Export button to begin the download.
Step 4: Review Exported Data
Open the exported file in your preferred software, such as Excel or Google Sheets, to review and analyze the data.
Step 5: Use Reports for Analysis
- Share the exported data with clients to provide detailed project insights.
- Use the data for internal analysis, such as performance tracking or financial reporting.
Tips for Efficient Data Export
- Use consistent naming conventions for exported files to keep them organized.
- Schedule regular exports to maintain updated records for ongoing projects.
- Combine this feature with the Quick Model Searching Tutorial to easily locate models for export.
Future Partner Integration Tutorial
The Future Partner Integration feature aims to make MPExtension a centralized hub for accessing tools and services from Matterport partners. This will streamline workflows by enabling seamless integration of third-party features directly into the extension.
Planned Features
- Access partner tools, add-ons, and services directly from the MPExtension sidebar.
- Enable new features from partners without needing to switch platforms.
- View and interact with third-party analytics, reporting tools, and additional data overlays.
Potential Use Cases
- Integrate project management tools to synchronize data and updates across platforms.
- Use advanced analytics and reporting tools from Matterport partners to gain deeper insights into your models and projects.
- Quickly activate or deactivate partner features as needed, providing flexibility in managing your workflow.
How to Prepare for Future Partner Integrations
While this feature is still under development, you can take steps to prepare for its release:
- Identify the Matterport partner tools you use frequently and consider how they might fit into your workflow when integrated with MPExtension.
- Stay updated with MPExtension's release notes and announcements to learn about new partner integrations as they roll out.
- Provide feedback or suggestions about potential integrations that would benefit your workflow by using the Feedback Portal.
Tips for Maximizing Integration Benefits
- Collaborate with partners to ensure that integrated tools meet your specific needs.
- Regularly update MPExtension to take advantage of the latest integrations and enhancements.
Mattertraffic Integration Tutorial
The Mattertraffic Integration feature will bring Mattertraffic's powerful data reporting and analytics capabilities directly into MPExtension. This integration will enhance your Matterport Dashboard experience by seamlessly combining Mattertraffic insights with MPExtension tools.
Planned Features
- Subscribe to Mattertraffic email reports directly through MPExtension.
- View key analytics and engagement data for your Matterport models within the MPExtension interface.
- Access data overlays sourced from Mattertraffic to improve model management and client reporting.
How It Works
- Email Reports: Users will be able to opt into email reports that summarize model engagement and performance metrics.
- Dashboard Analytics: Key Mattertraffic analytics will be displayed directly in the MPExtension sidebar, giving users real-time insights.
- Data Overlays: Enhanced model management features will allow users to overlay Mattertraffic data directly onto their Matterport models.
Tips for Leveraging Mattertraffic Integration
- Use analytics to better understand client engagement and tailor your services accordingly.
- Combine Mattertraffic's data insights with MPExtension's exporting and reporting tools for comprehensive client presentations.
- Monitor engagement trends to identify opportunities for improvement in your model designs or marketing strategies.
Current Status
While the integration is currently under development, users can continue to access Mattertraffic features through the Mattertraffic.com domain. Future updates will integrate these capabilities directly into MPExtension for a unified workflow.
How to Stay Updated
Keep an eye on the MPExtension release notes for announcements about the Mattertraffic integration. If you have specific features you'd like to see, share your feedback on the Feedback Portal.
Traffic Insights Overlay Tutorial
The Traffic Insights Overlay feature in MPExtension provides real-time analytics directly within the Matterport Showcase interface. This tool helps you monitor model performance, offering insights such as total visits, unique visits, and engagement duration.
Step 1: Enable the Traffic Insights Overlay
- Open the MPExtension by clicking the extension icon in Chrome.
- Navigate to the Settings Tab in the sidebar and toggle the Traffic Overlay option to enable the feature.
- Once enabled, the traffic analytics will appear as an overlay on the Showcase interface.
Step 2: Understand the Overlay Data
- Total Visits: Displays the cumulative number of visits to your model.
- Unique Visits: Tracks the number of distinct visitors who have accessed the model.
- Engagement Duration: Shows the average time visitors spend interacting with your model.
Step 3: Customize the Overlay
Use the filter options to adjust the analytics view:
- Timeframe: Filter data by periods such as the last 7 days or 30 days.
- Visibility: Toggle the overlay visibility on or off as needed.
Step 4: Use the Insights
Leverage the analytics data to make informed decisions about your model's performance:
- Identify popular models to focus on for marketing efforts.
- Track visitor engagement to assess model effectiveness.
- Understand trends and optimize your Showcase experience accordingly.
Tips for Best Use
- Combine the Traffic Insights Overlay with Data Export to generate comprehensive analytics reports.
- Bookmark high-performing models to prioritize updates. (See the Model Bookmarking Tutorial.)